> ## Documentation Index
> Fetch the complete documentation index at: https://docs.rownd.io/llms.txt
> Use this file to discover all available pages before exploring further.
# OpenID Connect Setup
## Table of Contents
1. [Set up using the platform](#using-the-rownd-platform)
2. [Setup using the API](#using-the-api)
* [Required headers](#required-headers)
* [API endpoints](#api-endpoints)
* [OIDC configuration discovery](#oidc-configuration-discovery)
* [OIDC endpoints](#oidc-endpoints)
* [Response format](#response-format)
* [Logo management](#uploading-oidc-client-logos)
* [Upload requirements](#required-headers-1)
* [Logo parameters](#parameters)
* [Advanced configuration](#advanced-configuration)
* [Custom interaction endpoint](#custom-interaction-endpoint)
* [User flow example](#user-flow-example)
### Using the Rownd Platform
You can set up an OIDC client directly through the [Rownd platform](https://app.rownd.io):
**1. Navigate to your application**
**2. Open the "App Keys" page on the left menu and click on the "OIDC Clients" tab**
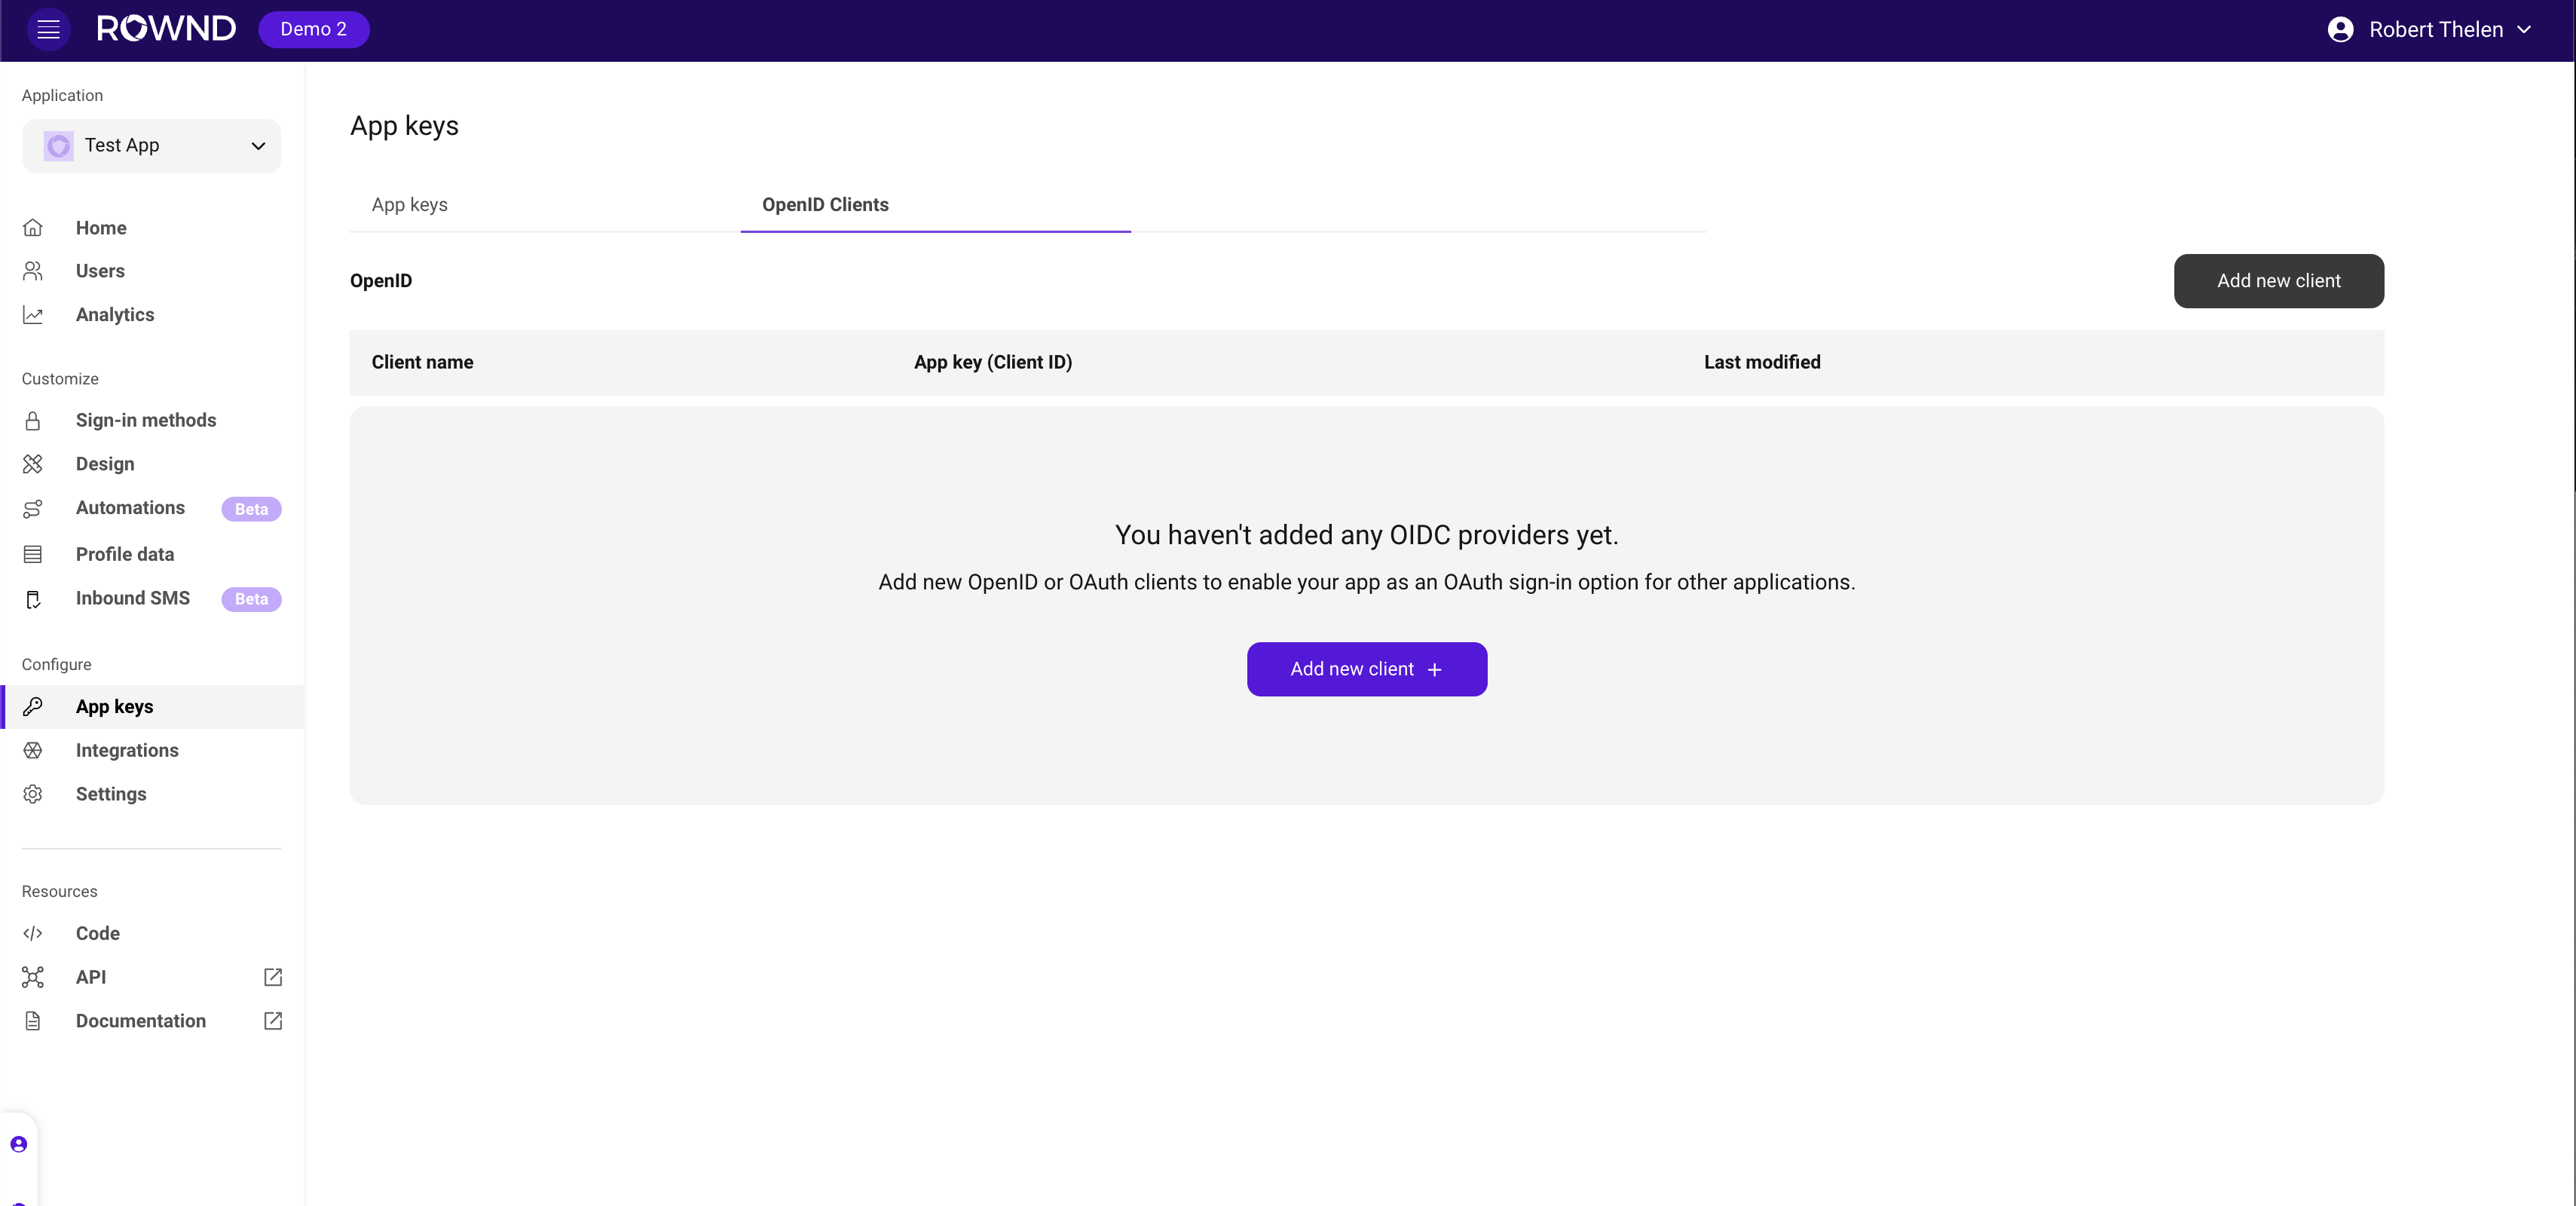 **3. Click "Create New OIDC Client"**
**4. Set your OIDC client details**
**3. Click "Create New OIDC Client"**
**4. Set your OIDC client details**
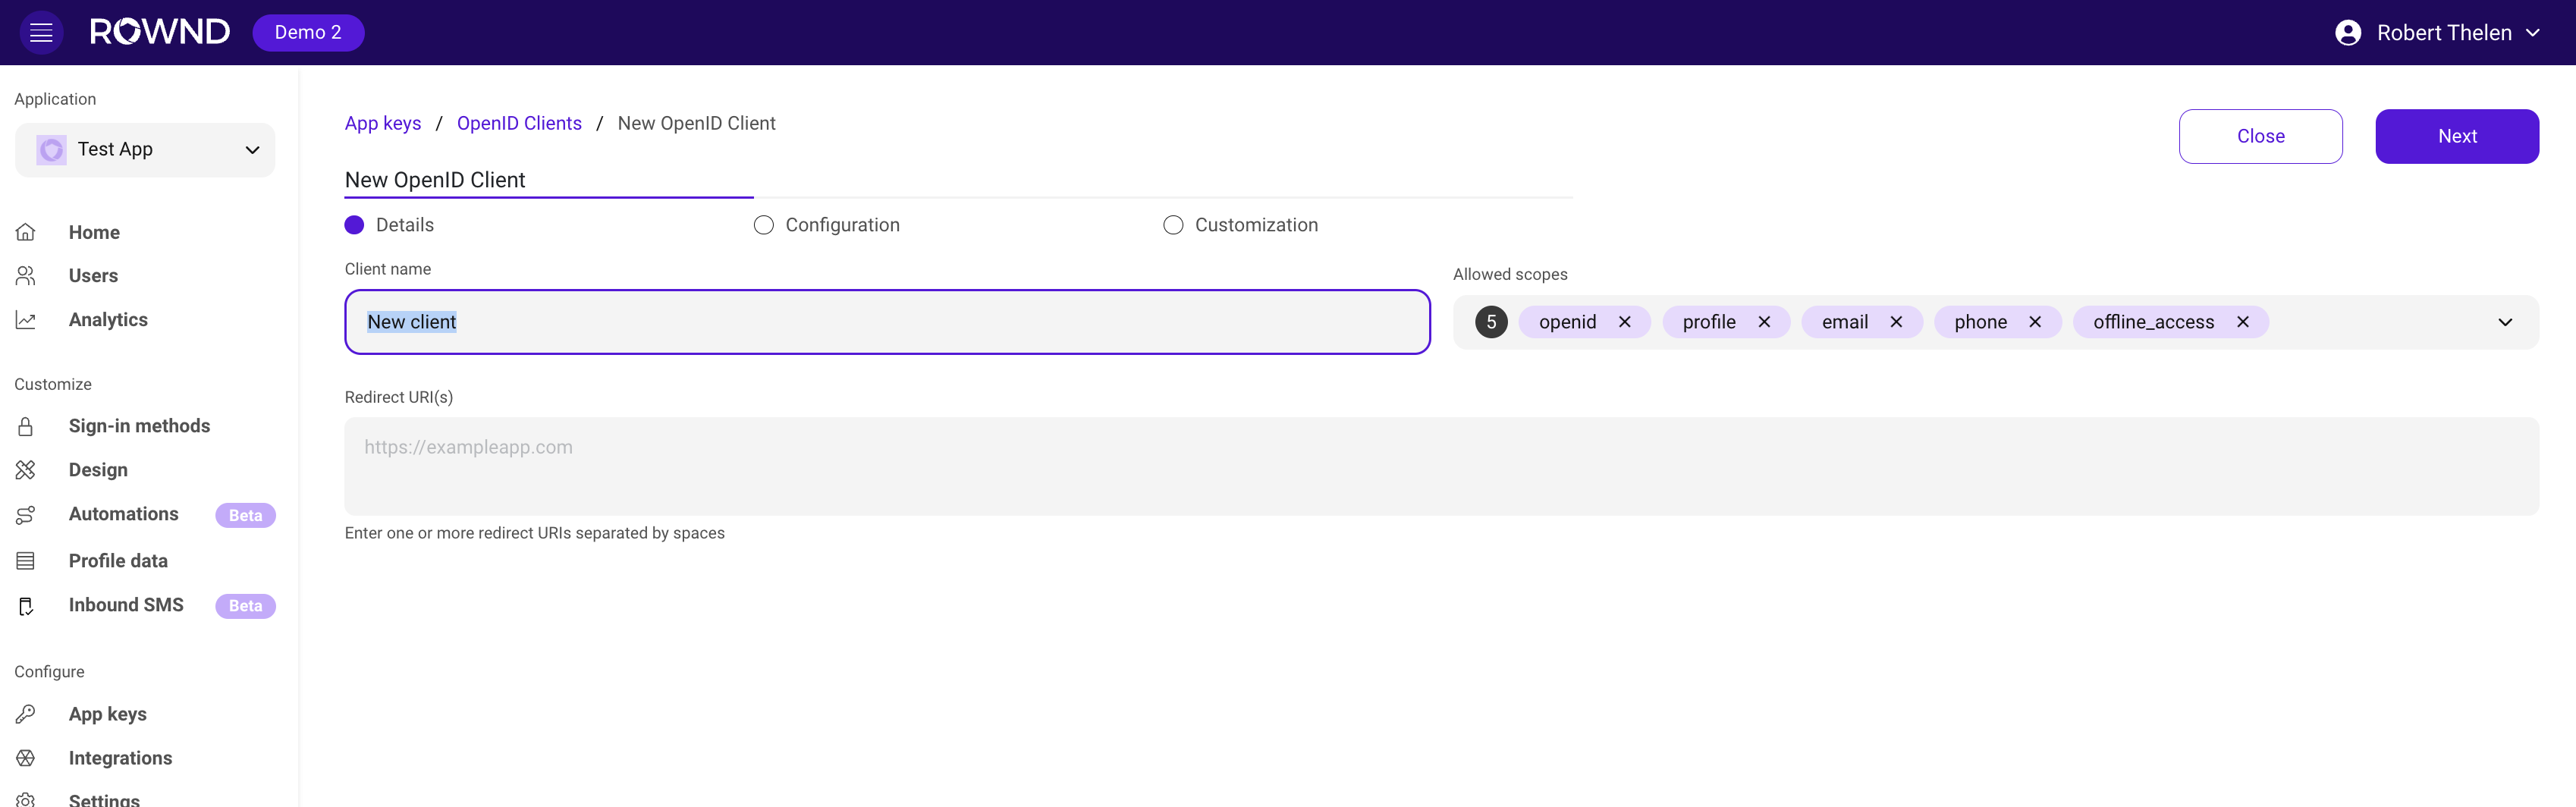 #### Fields
* **Name**: A display name for your OIDC client (required)
* **Redirect URIs**: Where users will be redirected after authentication (required). You can add more than one.
* Example: `https://example.com/callback`
* **Allowed Scopes**: The scopes that the OIDC client is allowed to request. You can add more than one.
* Example: `openid profile email` ; note; you can add additional date fields to Rownd for more finite scopes.
Click "Next"
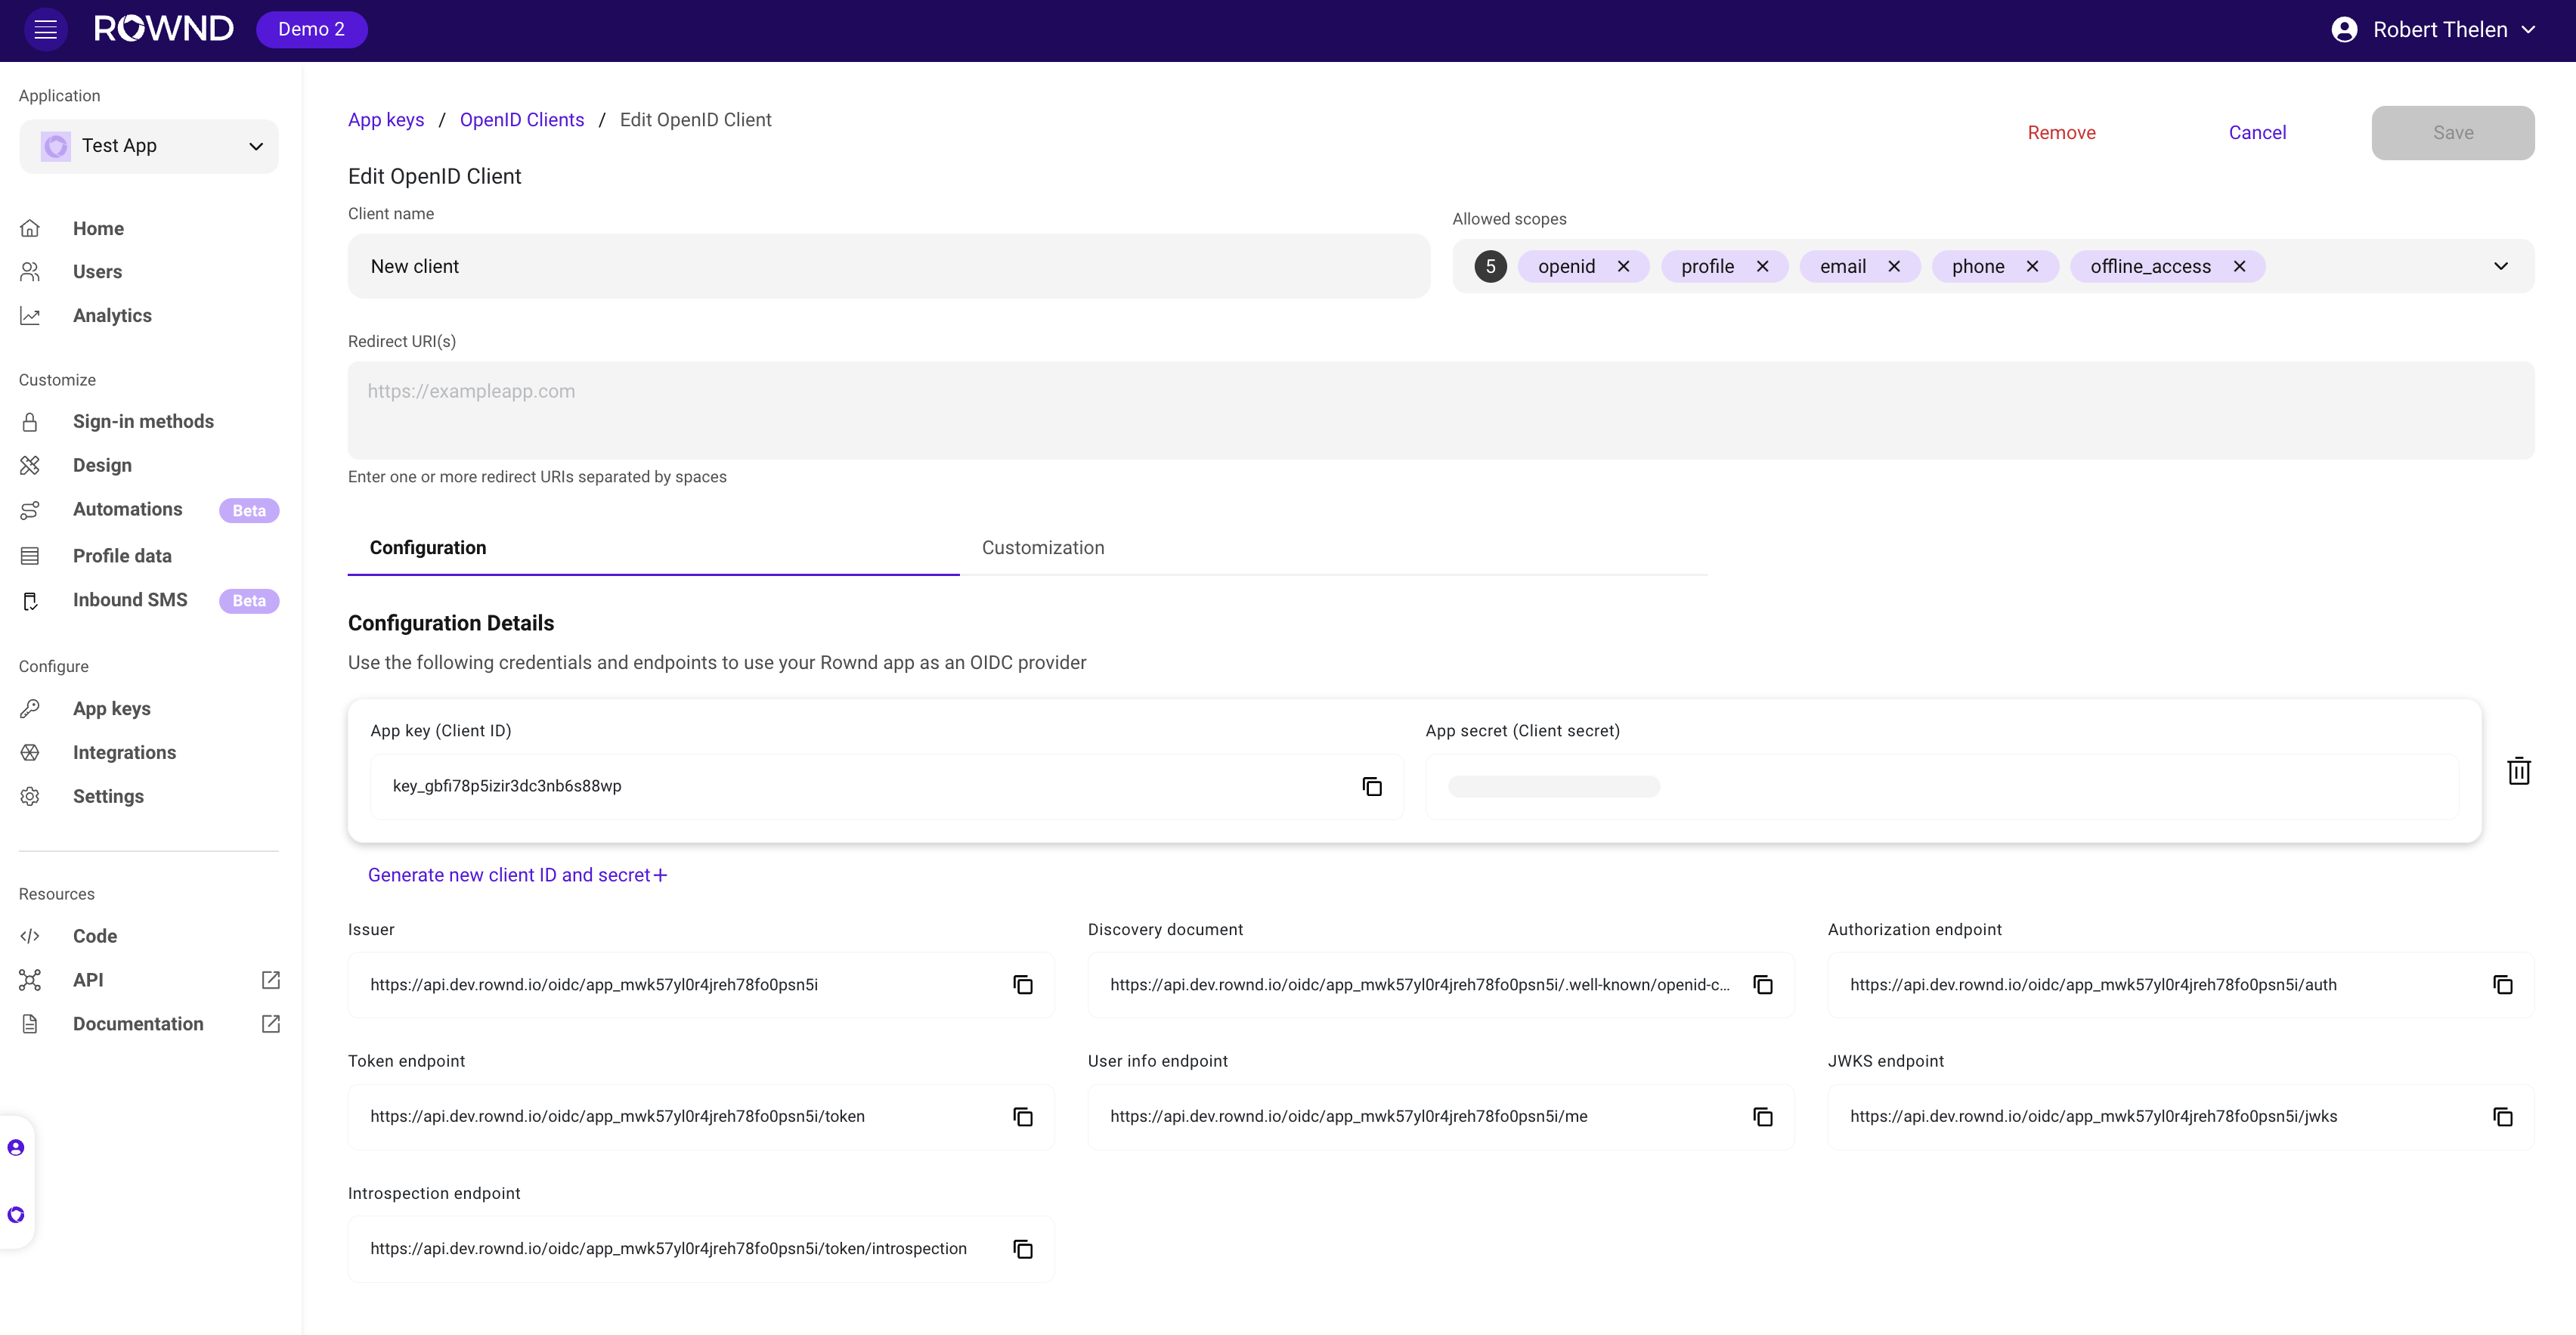
**5. Retrieve client credentials and OpenID endpoints**
You can now retrieve your client credentials and use them to configure your OIDC client. You can also see the OIDC endpoints.
Make sure to save your client credentials (client\_id and secret) after creation, as the secret cannot be retrieved later.
#### Fields
* **Name**: A display name for your OIDC client (required)
* **Redirect URIs**: Where users will be redirected after authentication (required). You can add more than one.
* Example: `https://example.com/callback`
* **Allowed Scopes**: The scopes that the OIDC client is allowed to request. You can add more than one.
* Example: `openid profile email` ; note; you can add additional date fields to Rownd for more finite scopes.
Click "Next"
**5. Retrieve client credentials and OpenID endpoints**
You can now retrieve your client credentials and use them to configure your OIDC client. You can also see the OIDC endpoints.
Make sure to save your client credentials (client\_id and secret) after creation, as the secret cannot be retrieved later.
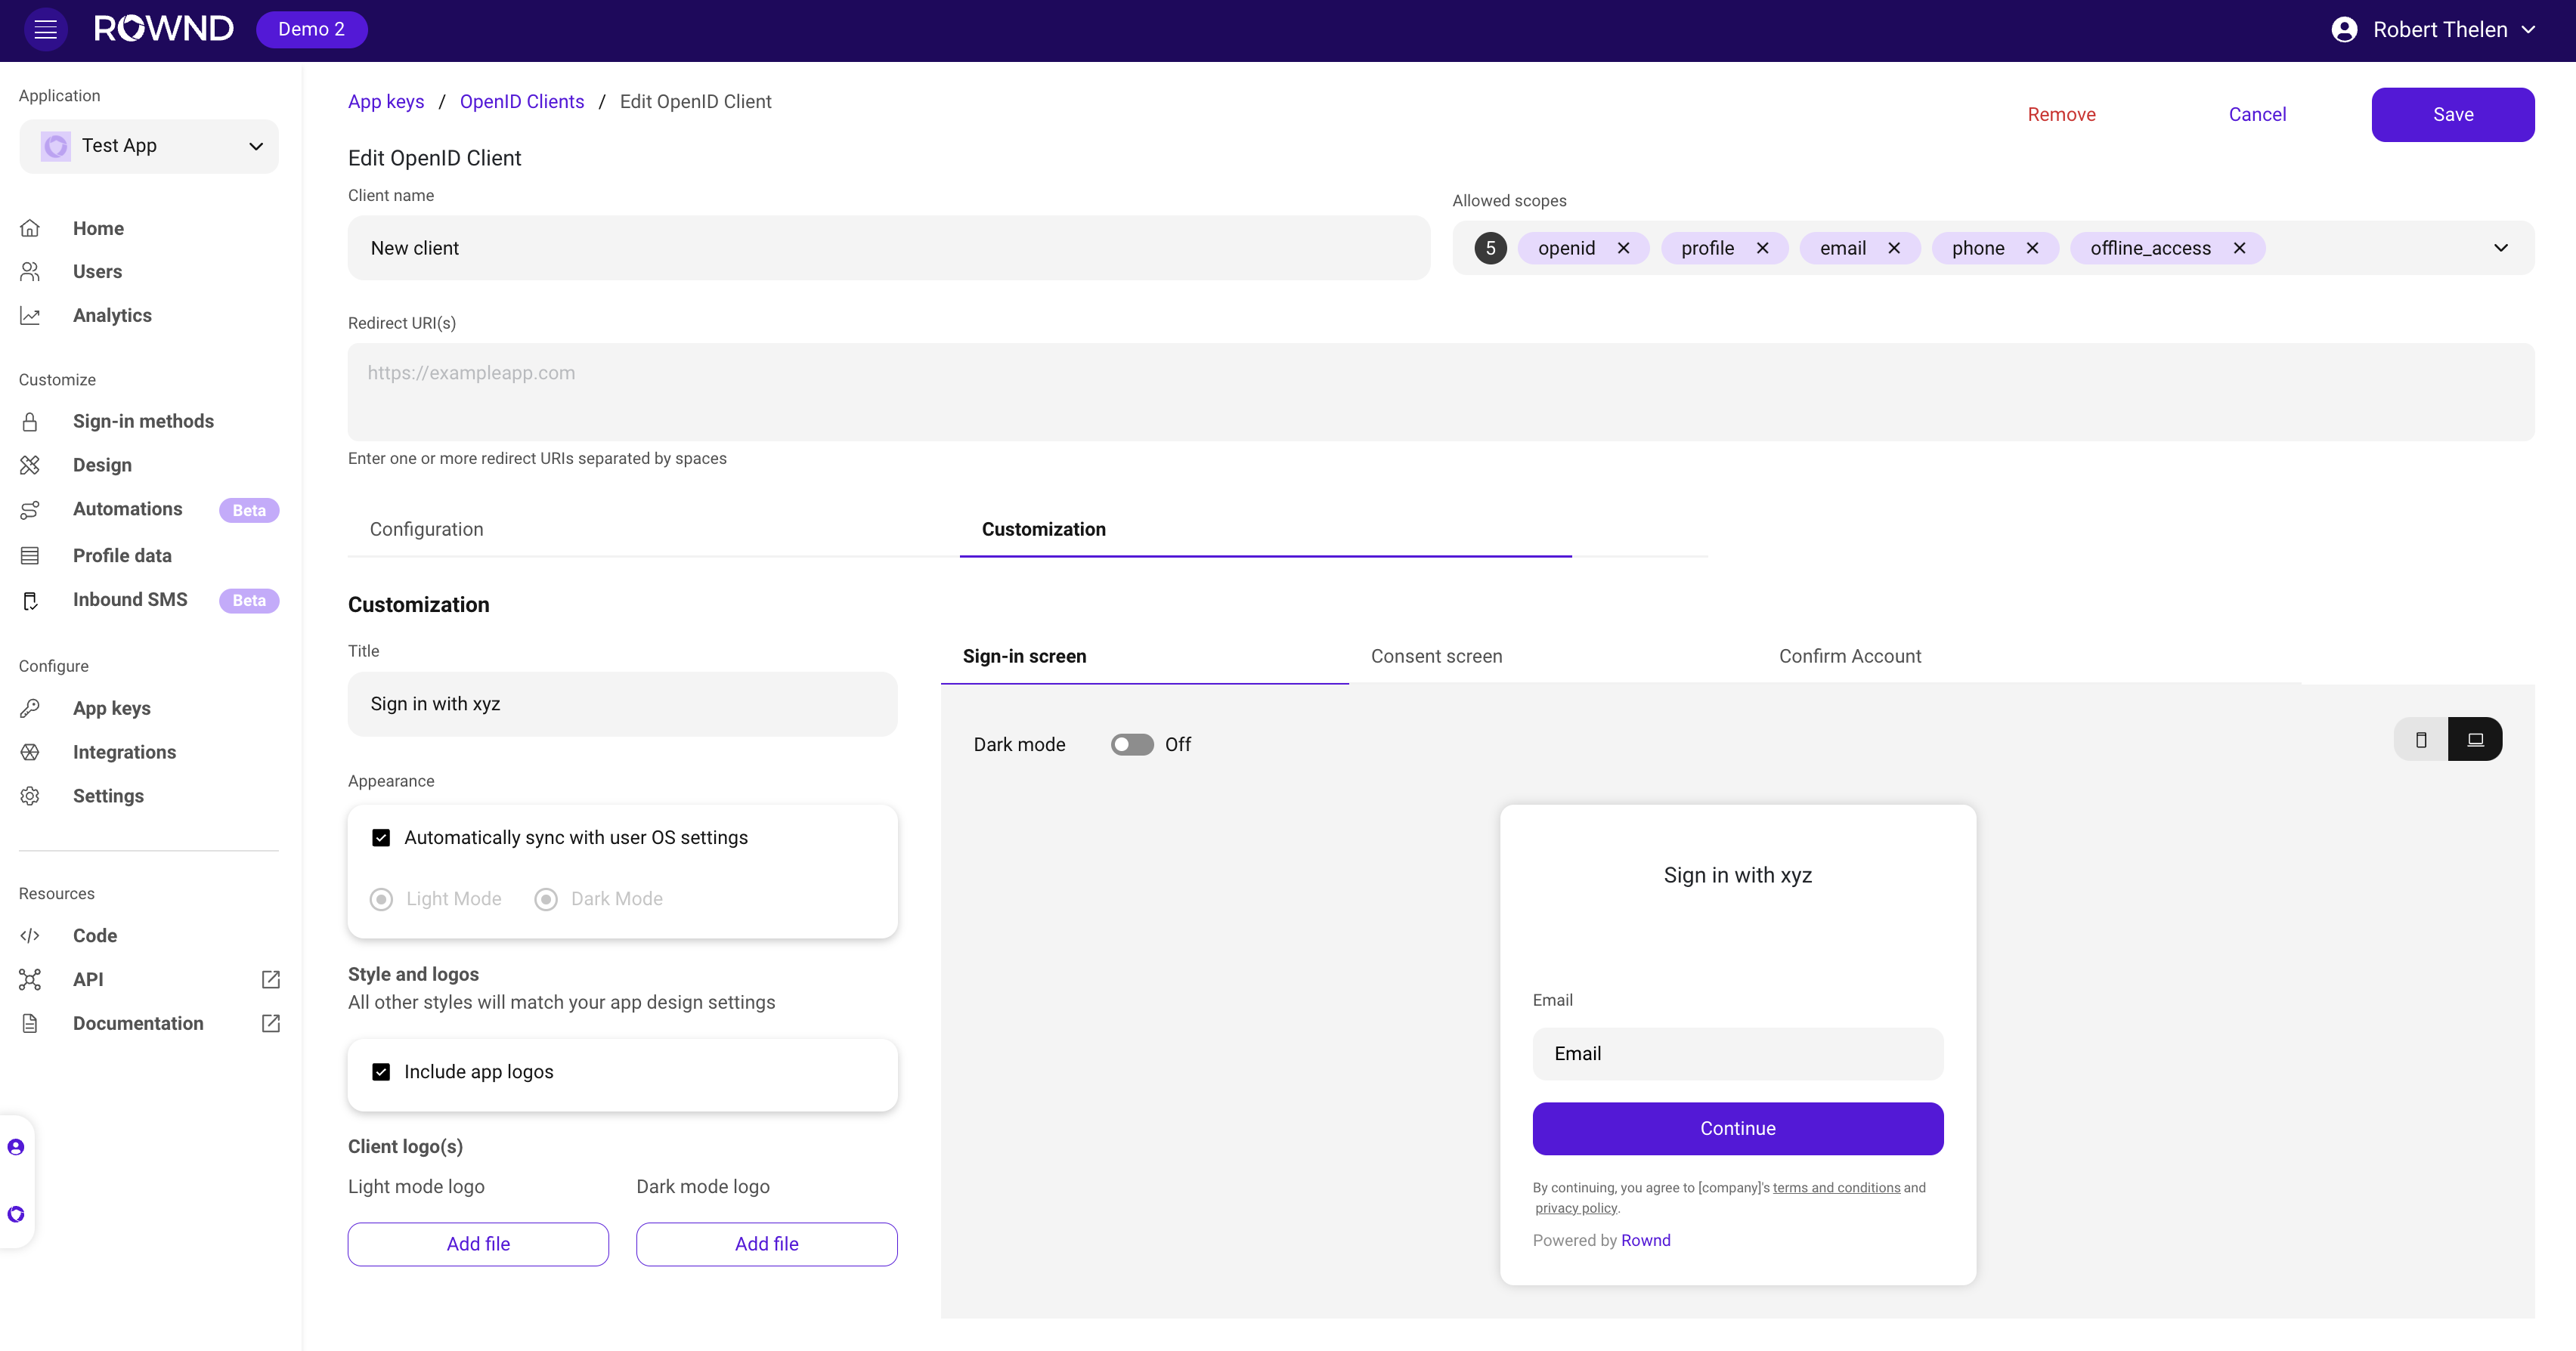
 **6. OIDC customizations**
Click on "Customizations" to customize sign-in and consent modals with a call to action and logos that help your users stay in context.
**6. OIDC customizations**
Click on "Customizations" to customize sign-in and consent modals with a call to action and logos that help your users stay in context.
 ### Using the API
To create or update an OIDC client configuration via the API, you'll need your Rownd application credentials.
#### Required headers
| Header | Description |
| -------------------- | ----------------------------- |
| `x-rownd-app-key` | Your Rownd application key |
| `x-rownd-app-secret` | Your Rownd application secret |
#### API endpoints
* Create: `POST https://api.rownd.io/applications/{app-id}/oidc-clients`
* Update: `PUT https://api.rownd.io/applications/{app-id}/oidc-clients/{client-id}`
#### cURL Example
```bash theme={null}
# Create new OIDC client
curl -X POST 'https://api.rownd.io/applications/{app-id}/oidc-clients' \
-H 'x-rownd-app-key: YOUR_APP_KEY' \
-H 'x-rownd-app-secret: YOUR_APP_SECRET' \
-H 'Content-Type: application/json' \
-d '{
"name": "Example OIDC Provider",
"description": "Example OIDC Provider",
"config": {
"allowed_origins": [
"https://example.com"
],
"redirect_uris": [
"https://example.com/callback"
],
"post_logout_uris": [
"https://example.com/logout"
],
"logo_uri": "https://storage.rownd.io/logo-example.png",
"logo_dark_mode_uri": "https://storage.rownd.io/logo-dark-example.png"
}
}'
# Update existing OIDC client
curl -X PUT 'https://api.rownd.io/applications/{app-id}/oidc-clients/{client-id}' \
-H 'x-rownd-app-key: YOUR_APP_KEY' \
-H 'x-rownd-app-secret: YOUR_APP_SECRET' \
-H 'Content-Type: application/json' \
-d '{
"name": "Updated OIDC Provider",
"description": "Updated OIDC Provider",
"config": {
"allowed_origins": [
"https://example.com"
],
"redirect_uris": [
"https://example.com/callback"
],
"post_logout_uris": [
"https://example.com/logout"
],
"logo_uri": "https://storage.rownd.io/logo-example.png",
"logo_dark_mode_uri": "https://storage.rownd.io/logo-dark-example.png"
}
}'
```
Replace `YOUR_APP_KEY`, `YOUR_APP_SECRET`, and `{app-id}` with your actual Rownd application credentials and ID. For the update request, also replace `{client-id}` with your OIDC client ID.
## Configuration
Refer to the [Rownd OpenID Connect API documentation](/api-reference/oidc/clients) for detailed information on creating and managing OpenID clients.
To create a new OIDC client configuration, send a POST request to `api.rownd.io/applications/{app-id}/oidc-clients` with the following body parameters:
### Request Body Parameters
| Parameter | Description |
| --------------------------- | ----------------------------------------------------------------------- |
| `name` | The display name of your OIDC client |
| `description` | A brief description of your OIDC client |
| `config.allowed_origins` | Array of allowed origins that can make requests to the OIDC server |
| `config.redirect_uris` | Array of valid URIs where users will be redirected after authentication |
| `config.post_logout_uris` | Array of valid URIs where users will be redirected after logging out |
| `config.logo_uri` | URL to the logo image used in light mode |
| `config.logo_dark_mode_uri` | URL to the logo image used in dark mode |
### Example Request
```json theme={null}
{
"name": "Example OIDC Provider",
"description": "Example OIDC Provider",
"config": {
"allowed_origins": [
"https://example.com"
],
"redirect_uris": [
"https://example.com/callback"
],
"post_logout_uris": [
"https://example.com/logout"
],
"logo_uri": "https://storage.rownd.io/logo-oidc-client-app_1234_oidcc_5667-filename.png",
"logo_dark_mode_uri": "https://storage.rownd.io/logo-oidc-client-app_1234_oidcc_5667-filename.png"
}
}
```
### Response Format
Both POST and PUT requests will return a response with the following structure:
```json theme={null}
{
"id": "oidc_client_ck9c1glf0100001l2f7z8z9z9",
"app_id": "app_ckl8bcf1g000001l2f7z8z9z9",
"name": "Example OIDC Provider",
"description": "Example OIDC Provider",
"config": {
"allowed_origins": [
"https://example.com"
],
"redirect_uris": [
"https://example.com/callback"
],
"post_logout_uris": [
"https://example.com/logout"
],
"logo_uri": "https://storage.rownd.io/logo-oidc-client-app_1234_oidcc_5667-filename.png",
"logo_dark_mode_uri": "https://storage.rownd.io/logo-oidc-client-app_1234_oidcc_5667-filename.png"
},
"created_at": "2024-12-05T23:34:05.709Z",
"updated_at": "2024-12-05T23:34:05.709Z",
"credentials": [
{
"name": "Production API Key",
"client_id": "string",
"secret": "string",
"expires": "2024-12-31T23:59:59Z",
"application": "app_k3y1qwerty12345",
"app_variant_id": "variant_fgy1qw367fty121lm",
"oidc_client_configuration_id": "oidcc_k3y1qwerty12345",
"created_at": "2024-12-05T23:34:05.709Z",
"updated_at": "2024-12-05T23:34:05.709Z"
}
]
}
```
### Response Fields
| Field | Description |
| ------------- | ------------------------------------------------------------- |
| `id` | Unique identifier for the OIDC client configuration |
| `app_id` | The Rownd application ID this configuration belongs to |
| `name` | Display name of the OIDC client |
| `description` | Description of the OIDC client |
| `config` | Configuration object containing origins, URIs, and logos |
| `created_at` | Timestamp of when the configuration was created |
| `updated_at` | Timestamp of the last update |
| `credentials` | Array of credential objects containing authentication details |
#### Credentials Object
| Field | Description |
| ------------------------------ | ---------------------------------------------- |
| `name` | Name of the credential |
| `client_id` | The OIDC client ID to use for authentication |
| `secret` | The client secret to use for authentication |
| `expires` | Expiration date of the credentials |
| `application` | Associated Rownd application ID |
| `app_variant_id` | Variant ID if applicable |
| `oidc_client_configuration_id` | ID of the OIDC client configuration |
| `created_at` | Timestamp of when the credentials were created |
| `updated_at` | Timestamp of the last credentials update |
Store the `client_id` and `secret` securely as they will be needed for all subsequent OIDC operations.
## OpenID Configuration Discovery
Rownd provides a standard OpenID Configuration discovery endpoint that returns a complete list of OIDC specifications and endpoints for your application.
### Discovery Endpoint
```http theme={null}
GET api.rownd.io/oidc/{app_id}/.well-known/openid-configuration
```
Replace `{app_id}` with your Rownd application ID to get the complete OIDC configuration for your app. For example:
```
https://api.rownd.io/oidc/app_wj43asd4ywn790plclbhux6a/.well-known/openid-configuration
```
This endpoint returns a JSON document containing all supported OIDC features, endpoints, and capabilities of your Rownd OIDC server, following the OpenID Connect Discovery specification.
The discovery endpoint is publicly accessible and does not require authentication. It's commonly used by OIDC clients to automatically configure themselves.
## OpenID Endpoints
Rownd provides three main OIDC endpoints, all accessible at `https://api.rownd.io/oidc/{app-id}/`:
### 1. Authorization Endpoint (`/auth`)
* Used to authenticate users and obtain authorization
* Initiates the authentication flow
* Returns an authorization code that can be exchanged for tokens
* Supports standard OIDC parameters like `scope`, `response_type`, and `redirect_uri`
### 2. Token Endpoint (`/token`)
* Exchanges authorization codes for access and ID tokens
* Supports refresh token requests
* Requires client authentication using client\_id and client\_secret
* Returns JWT tokens containing user information and access rights
### 3. UserInfo Endpoint (`/me`)
* Provides detailed information about the authenticated user
* Requires a valid access token
* Returns user profile data based on the granted scopes
* Supports standard OIDC claims
## Credentials
After creating an OIDC client configuration, you'll receive credentials in the response:
* `client_id`: Your unique client identifier
* `client_secret`: Your client secret for secure communication
Store your client\_secret securely! It cannot be recovered if lost and would require generating new credentials.
## Implementation Flow
1. Configure your OpenID client using the configuration endpoint
2. Store the returned client\_id and client\_secret securely
3. Implement the authorization flow:
* Direct users to the `/auth` endpoint for authentication
* Handle the callback with the authorization code
* Exchange the code for tokens at the `/token` endpoint
* Fetch user information from the `/me` endpoint as needed
## Example Implementation
```javascript theme={null}
// Example authorization request
const authUrl = `https://api.rownd.io/oidc/${appId}/auth?` +
`client_id=${clientId}&` +
`redirect_uri=${encodeURIComponent(redirectUri)}&` +
`response_type=code&` +
`scope=openid profile email`;
// Redirect user to authUrl
// After receiving the authorization code in your callback:
async function exchangeCode(code) {
const response = await fetch(`https://api.rownd.io/oidc/${appId}/token`, {
method: 'POST',
headers: {
'Content-Type': 'application/x-www-form-urlencoded',
},
body: new URLSearchParams({
grant_type: 'authorization_code',
code,
client_id: clientId,
client_secret: clientSecret,
redirect_uri: redirectUri,
}),
});
return await response.json();
}
```
## Best Practices
1. Always use HTTPS for redirect URIs
2. Implement proper token storage and refresh mechanisms
3. Validate all tokens on your backend
4. Keep your client\_secret secure and never expose it in client-side code
5. Implement proper error handling for all OIDC endpoints
Need help? Contact our [support team](mailto:support@rownd.io) for assistance with your OIDC implementation.
### Uploading OpenID Client Logos
You can upload custom logos for your OIDC client that will be displayed in light and dark modes. Logos can be uploaded using the following API endpoint.
#### Logo Upload Endpoint
```http theme={null}
PUT /application/{app-id}/oidc_clients/{client-id}/logo/{type}
```
#### Parameters
| Parameter | Description |
| --------- | --------------------------------------------------------- |
| `app` | Your Rownd application ID |
| `client` | Your OIDC client ID |
| `type` | Either 'light' or 'dark' for the respective display modes |
#### Required Headers
| Header | Description |
| -------------------- | ----------------------------- |
| `x-rownd-app-key` | Your Rownd application key |
| `x-rownd-app-secret` | Your Rownd application secret |
| `x-rownd-filename` | The filename of your logo |
Only PNG and SVG file formats are supported for logo uploads.
#### cURL Example
```bash theme={null}
# Upload light mode logo
curl -X PUT 'https://api.rownd.io/application/{app-id}/oidc_clients/{client-id}/logo/light' \
-H 'x-rownd-app-key: YOUR_APP_KEY' \
-H 'x-rownd-app-secret: YOUR_APP_SECRET' \
-H 'x-rownd-filename: logo.png' \
-H 'Content-Type: image/png' \
--data-binary '@/path/to/your/logo.png'
# Upload dark mode logo
curl -X PUT 'https://api.rownd.io/application/{app-id}/oidc_clients/{client-id}/logo/dark' \
-H 'x-rownd-app-key: YOUR_APP_KEY' \
-H 'x-rownd-app-secret: YOUR_APP_SECRET' \
-H 'x-rownd-filename: logo-dark.svg' \
-H 'Content-Type: image/svg+xml' \
--data-binary '@/path/to/your/logo-dark.svg'
```
Ensure your logo files meet the following requirements:
* File format: PNG or SVG only
* Recommended dimensions: At least 512x512 pixels for optimal display
* File size: Keep files under 5MB for best performance
### Advanced configuration
#### Custom interaction endpoint
By default, OpenID authentication flows direct users to a Rownd-hosted URL for sign-in. However, if you have Rownd integrated into your website or application, you can provide a custom interaction endpoint for a more streamlined experience.
When configured, users will be directed to your site/app instead of the default Rownd URL. This provides several benefits:
* Maintains your branded experience
* Leverages existing user sessions
* Reduces authentication steps when users are already logged in
* Provides a more seamless OIDC consent flow
##### Configuration
Add the `interaction_endpoint` to your OIDC client configuration under the `config` object:
```json theme={null}
{
"name": "Example OIDC Provider",
"description": "Example OIDC Provider",
"config": {
"allowed_origins": [
"https://example.com"
],
"redirect_uris": [
"https://example.com/callback"
],
"post_logout_uris": [
"https://example.com/logout"
],
"interaction_endpoint": "https://example.com/auth",
"logo_uri": "https://storage.rownd.io/logo-example.png",
"logo_dark_mode_uri": "https://storage.rownd.io/logo-dark-example.png"
}
}
```
The interaction endpoint must be a page where the Rownd JavaScript snippet is properly installed and configured (a single-page app like React will also work). This ensures the authentication flow can properly handle the OpenID consent process.
##### User flow example
1. User initiates OIDC sign-in from a third-party application
2. Instead of going to `hub.rownd.io`, they are redirected to your custom endpoint (e.g., `https://example.com/auth`)
3. If the user is already signed in on your site:
* They only need to approve the OIDC consent
* No additional authentication is required
4. If the user is not signed in:
* They'll see your normal Rownd authentication flow
* After signing in, they'll be prompted for OIDC consent
5. After consent, they are redirected back to the original application
This approach can significantly reduce friction in the authentication process, especially for users who frequently interact with your platform.
### Using the API
To create or update an OIDC client configuration via the API, you'll need your Rownd application credentials.
#### Required headers
| Header | Description |
| -------------------- | ----------------------------- |
| `x-rownd-app-key` | Your Rownd application key |
| `x-rownd-app-secret` | Your Rownd application secret |
#### API endpoints
* Create: `POST https://api.rownd.io/applications/{app-id}/oidc-clients`
* Update: `PUT https://api.rownd.io/applications/{app-id}/oidc-clients/{client-id}`
#### cURL Example
```bash theme={null}
# Create new OIDC client
curl -X POST 'https://api.rownd.io/applications/{app-id}/oidc-clients' \
-H 'x-rownd-app-key: YOUR_APP_KEY' \
-H 'x-rownd-app-secret: YOUR_APP_SECRET' \
-H 'Content-Type: application/json' \
-d '{
"name": "Example OIDC Provider",
"description": "Example OIDC Provider",
"config": {
"allowed_origins": [
"https://example.com"
],
"redirect_uris": [
"https://example.com/callback"
],
"post_logout_uris": [
"https://example.com/logout"
],
"logo_uri": "https://storage.rownd.io/logo-example.png",
"logo_dark_mode_uri": "https://storage.rownd.io/logo-dark-example.png"
}
}'
# Update existing OIDC client
curl -X PUT 'https://api.rownd.io/applications/{app-id}/oidc-clients/{client-id}' \
-H 'x-rownd-app-key: YOUR_APP_KEY' \
-H 'x-rownd-app-secret: YOUR_APP_SECRET' \
-H 'Content-Type: application/json' \
-d '{
"name": "Updated OIDC Provider",
"description": "Updated OIDC Provider",
"config": {
"allowed_origins": [
"https://example.com"
],
"redirect_uris": [
"https://example.com/callback"
],
"post_logout_uris": [
"https://example.com/logout"
],
"logo_uri": "https://storage.rownd.io/logo-example.png",
"logo_dark_mode_uri": "https://storage.rownd.io/logo-dark-example.png"
}
}'
```
Replace `YOUR_APP_KEY`, `YOUR_APP_SECRET`, and `{app-id}` with your actual Rownd application credentials and ID. For the update request, also replace `{client-id}` with your OIDC client ID.
## Configuration
Refer to the [Rownd OpenID Connect API documentation](/api-reference/oidc/clients) for detailed information on creating and managing OpenID clients.
To create a new OIDC client configuration, send a POST request to `api.rownd.io/applications/{app-id}/oidc-clients` with the following body parameters:
### Request Body Parameters
| Parameter | Description |
| --------------------------- | ----------------------------------------------------------------------- |
| `name` | The display name of your OIDC client |
| `description` | A brief description of your OIDC client |
| `config.allowed_origins` | Array of allowed origins that can make requests to the OIDC server |
| `config.redirect_uris` | Array of valid URIs where users will be redirected after authentication |
| `config.post_logout_uris` | Array of valid URIs where users will be redirected after logging out |
| `config.logo_uri` | URL to the logo image used in light mode |
| `config.logo_dark_mode_uri` | URL to the logo image used in dark mode |
### Example Request
```json theme={null}
{
"name": "Example OIDC Provider",
"description": "Example OIDC Provider",
"config": {
"allowed_origins": [
"https://example.com"
],
"redirect_uris": [
"https://example.com/callback"
],
"post_logout_uris": [
"https://example.com/logout"
],
"logo_uri": "https://storage.rownd.io/logo-oidc-client-app_1234_oidcc_5667-filename.png",
"logo_dark_mode_uri": "https://storage.rownd.io/logo-oidc-client-app_1234_oidcc_5667-filename.png"
}
}
```
### Response Format
Both POST and PUT requests will return a response with the following structure:
```json theme={null}
{
"id": "oidc_client_ck9c1glf0100001l2f7z8z9z9",
"app_id": "app_ckl8bcf1g000001l2f7z8z9z9",
"name": "Example OIDC Provider",
"description": "Example OIDC Provider",
"config": {
"allowed_origins": [
"https://example.com"
],
"redirect_uris": [
"https://example.com/callback"
],
"post_logout_uris": [
"https://example.com/logout"
],
"logo_uri": "https://storage.rownd.io/logo-oidc-client-app_1234_oidcc_5667-filename.png",
"logo_dark_mode_uri": "https://storage.rownd.io/logo-oidc-client-app_1234_oidcc_5667-filename.png"
},
"created_at": "2024-12-05T23:34:05.709Z",
"updated_at": "2024-12-05T23:34:05.709Z",
"credentials": [
{
"name": "Production API Key",
"client_id": "string",
"secret": "string",
"expires": "2024-12-31T23:59:59Z",
"application": "app_k3y1qwerty12345",
"app_variant_id": "variant_fgy1qw367fty121lm",
"oidc_client_configuration_id": "oidcc_k3y1qwerty12345",
"created_at": "2024-12-05T23:34:05.709Z",
"updated_at": "2024-12-05T23:34:05.709Z"
}
]
}
```
### Response Fields
| Field | Description |
| ------------- | ------------------------------------------------------------- |
| `id` | Unique identifier for the OIDC client configuration |
| `app_id` | The Rownd application ID this configuration belongs to |
| `name` | Display name of the OIDC client |
| `description` | Description of the OIDC client |
| `config` | Configuration object containing origins, URIs, and logos |
| `created_at` | Timestamp of when the configuration was created |
| `updated_at` | Timestamp of the last update |
| `credentials` | Array of credential objects containing authentication details |
#### Credentials Object
| Field | Description |
| ------------------------------ | ---------------------------------------------- |
| `name` | Name of the credential |
| `client_id` | The OIDC client ID to use for authentication |
| `secret` | The client secret to use for authentication |
| `expires` | Expiration date of the credentials |
| `application` | Associated Rownd application ID |
| `app_variant_id` | Variant ID if applicable |
| `oidc_client_configuration_id` | ID of the OIDC client configuration |
| `created_at` | Timestamp of when the credentials were created |
| `updated_at` | Timestamp of the last credentials update |
Store the `client_id` and `secret` securely as they will be needed for all subsequent OIDC operations.
## OpenID Configuration Discovery
Rownd provides a standard OpenID Configuration discovery endpoint that returns a complete list of OIDC specifications and endpoints for your application.
### Discovery Endpoint
```http theme={null}
GET api.rownd.io/oidc/{app_id}/.well-known/openid-configuration
```
Replace `{app_id}` with your Rownd application ID to get the complete OIDC configuration for your app. For example:
```
https://api.rownd.io/oidc/app_wj43asd4ywn790plclbhux6a/.well-known/openid-configuration
```
This endpoint returns a JSON document containing all supported OIDC features, endpoints, and capabilities of your Rownd OIDC server, following the OpenID Connect Discovery specification.
The discovery endpoint is publicly accessible and does not require authentication. It's commonly used by OIDC clients to automatically configure themselves.
## OpenID Endpoints
Rownd provides three main OIDC endpoints, all accessible at `https://api.rownd.io/oidc/{app-id}/`:
### 1. Authorization Endpoint (`/auth`)
* Used to authenticate users and obtain authorization
* Initiates the authentication flow
* Returns an authorization code that can be exchanged for tokens
* Supports standard OIDC parameters like `scope`, `response_type`, and `redirect_uri`
### 2. Token Endpoint (`/token`)
* Exchanges authorization codes for access and ID tokens
* Supports refresh token requests
* Requires client authentication using client\_id and client\_secret
* Returns JWT tokens containing user information and access rights
### 3. UserInfo Endpoint (`/me`)
* Provides detailed information about the authenticated user
* Requires a valid access token
* Returns user profile data based on the granted scopes
* Supports standard OIDC claims
## Credentials
After creating an OIDC client configuration, you'll receive credentials in the response:
* `client_id`: Your unique client identifier
* `client_secret`: Your client secret for secure communication
Store your client\_secret securely! It cannot be recovered if lost and would require generating new credentials.
## Implementation Flow
1. Configure your OpenID client using the configuration endpoint
2. Store the returned client\_id and client\_secret securely
3. Implement the authorization flow:
* Direct users to the `/auth` endpoint for authentication
* Handle the callback with the authorization code
* Exchange the code for tokens at the `/token` endpoint
* Fetch user information from the `/me` endpoint as needed
## Example Implementation
```javascript theme={null}
// Example authorization request
const authUrl = `https://api.rownd.io/oidc/${appId}/auth?` +
`client_id=${clientId}&` +
`redirect_uri=${encodeURIComponent(redirectUri)}&` +
`response_type=code&` +
`scope=openid profile email`;
// Redirect user to authUrl
// After receiving the authorization code in your callback:
async function exchangeCode(code) {
const response = await fetch(`https://api.rownd.io/oidc/${appId}/token`, {
method: 'POST',
headers: {
'Content-Type': 'application/x-www-form-urlencoded',
},
body: new URLSearchParams({
grant_type: 'authorization_code',
code,
client_id: clientId,
client_secret: clientSecret,
redirect_uri: redirectUri,
}),
});
return await response.json();
}
```
## Best Practices
1. Always use HTTPS for redirect URIs
2. Implement proper token storage and refresh mechanisms
3. Validate all tokens on your backend
4. Keep your client\_secret secure and never expose it in client-side code
5. Implement proper error handling for all OIDC endpoints
Need help? Contact our [support team](mailto:support@rownd.io) for assistance with your OIDC implementation.
### Uploading OpenID Client Logos
You can upload custom logos for your OIDC client that will be displayed in light and dark modes. Logos can be uploaded using the following API endpoint.
#### Logo Upload Endpoint
```http theme={null}
PUT /application/{app-id}/oidc_clients/{client-id}/logo/{type}
```
#### Parameters
| Parameter | Description |
| --------- | --------------------------------------------------------- |
| `app` | Your Rownd application ID |
| `client` | Your OIDC client ID |
| `type` | Either 'light' or 'dark' for the respective display modes |
#### Required Headers
| Header | Description |
| -------------------- | ----------------------------- |
| `x-rownd-app-key` | Your Rownd application key |
| `x-rownd-app-secret` | Your Rownd application secret |
| `x-rownd-filename` | The filename of your logo |
Only PNG and SVG file formats are supported for logo uploads.
#### cURL Example
```bash theme={null}
# Upload light mode logo
curl -X PUT 'https://api.rownd.io/application/{app-id}/oidc_clients/{client-id}/logo/light' \
-H 'x-rownd-app-key: YOUR_APP_KEY' \
-H 'x-rownd-app-secret: YOUR_APP_SECRET' \
-H 'x-rownd-filename: logo.png' \
-H 'Content-Type: image/png' \
--data-binary '@/path/to/your/logo.png'
# Upload dark mode logo
curl -X PUT 'https://api.rownd.io/application/{app-id}/oidc_clients/{client-id}/logo/dark' \
-H 'x-rownd-app-key: YOUR_APP_KEY' \
-H 'x-rownd-app-secret: YOUR_APP_SECRET' \
-H 'x-rownd-filename: logo-dark.svg' \
-H 'Content-Type: image/svg+xml' \
--data-binary '@/path/to/your/logo-dark.svg'
```
Ensure your logo files meet the following requirements:
* File format: PNG or SVG only
* Recommended dimensions: At least 512x512 pixels for optimal display
* File size: Keep files under 5MB for best performance
### Advanced configuration
#### Custom interaction endpoint
By default, OpenID authentication flows direct users to a Rownd-hosted URL for sign-in. However, if you have Rownd integrated into your website or application, you can provide a custom interaction endpoint for a more streamlined experience.
When configured, users will be directed to your site/app instead of the default Rownd URL. This provides several benefits:
* Maintains your branded experience
* Leverages existing user sessions
* Reduces authentication steps when users are already logged in
* Provides a more seamless OIDC consent flow
##### Configuration
Add the `interaction_endpoint` to your OIDC client configuration under the `config` object:
```json theme={null}
{
"name": "Example OIDC Provider",
"description": "Example OIDC Provider",
"config": {
"allowed_origins": [
"https://example.com"
],
"redirect_uris": [
"https://example.com/callback"
],
"post_logout_uris": [
"https://example.com/logout"
],
"interaction_endpoint": "https://example.com/auth",
"logo_uri": "https://storage.rownd.io/logo-example.png",
"logo_dark_mode_uri": "https://storage.rownd.io/logo-dark-example.png"
}
}
```
The interaction endpoint must be a page where the Rownd JavaScript snippet is properly installed and configured (a single-page app like React will also work). This ensures the authentication flow can properly handle the OpenID consent process.
##### User flow example
1. User initiates OIDC sign-in from a third-party application
2. Instead of going to `hub.rownd.io`, they are redirected to your custom endpoint (e.g., `https://example.com/auth`)
3. If the user is already signed in on your site:
* They only need to approve the OIDC consent
* No additional authentication is required
4. If the user is not signed in:
* They'll see your normal Rownd authentication flow
* After signing in, they'll be prompted for OIDC consent
5. After consent, they are redirected back to the original application
This approach can significantly reduce friction in the authentication process, especially for users who frequently interact with your platform.